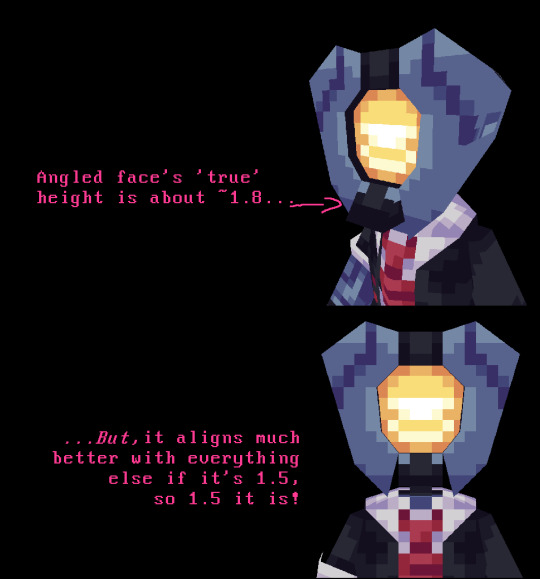
#manually generate UV
Explore tagged Tumblr posts
Visit Tumblr Blog
Explore Tumblr blogs with no restrictions, modern design and the best experience.
Last Seen Tumblr Blogs


Fun Fact
130K people were victims of a chain letter scam that affected Tumblr in May 2011.
Text

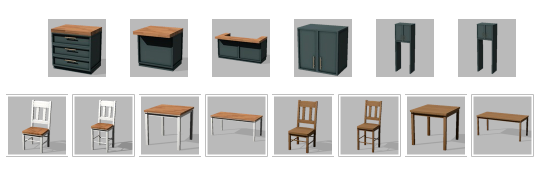

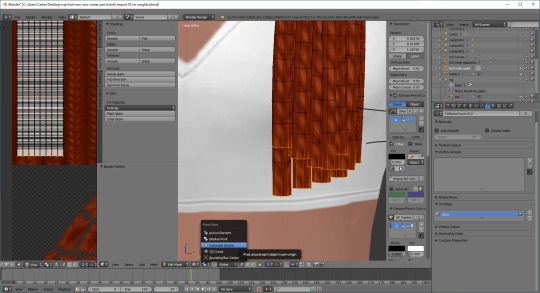
Basic Reduxe Kitchen
CC Set of 14 BGC Items
A combination of my Back to Basics and Basic Luxe kitchens, because I really liked my mesh for the Luxe ones, but I will always love butcher-block tops more than any other kitchen surface. It's a pretty standard kitchen and I think the file names are self-explanatory, so here are some bullet-points-of-interest:
Like my Basic Luxe kitchen, the counter's end pieces have been changed to an alternate full-tile model and a half-tile model for more customization.
The cabinet also contains half-tile end pieces
This color palette draws a few swatches from the Basic Luxe palette, but I changed the hardware color slightly, and grabbed a bunch of colors from sforz's various palettes
The dining set packages come in two standalone versions: one set that matches the rest of the kitchen's swatches, and another set of 18 solid wood tones (bottom two rows of palette image)
Disclaimer: I re-mapped the UVs for the island tops and some counter tops, so the dirt overlays may be funky-looking. Since you're supposed to clean them when they're dirty anyway I decided it wasn't worth the effort to figure out a seamless texture for them (if you saw the uv map you would understand)
Download link below the cut!
There isn't really much to say about this one! I thought it was going to be an easy project (when will I learn?) but I found some mistakes in the original meshes (nothing big but I'm a perfectionist) and fixed them along the way, which took extra time. And then I spent forever trying to decide on colors, and then trying to trim down the count (I cut 2 whole wood tones which helped decrease the number by about 30%).
I also decided to do custom thumbnails for these, because I liked the way they came out in my Basic Luxe set. I spent about three days manually generating, exporting, editing, and importing thumbnails (and even set up an auto-clicker program to help me!)... only to find out that S4S added a "catalogue thumbnail underlay" option in one of their updates. I'm still mentally recovering from that (read patch notes!!) 😔
Anyway, at least I got to play with ReShade a bunch! I've been mostly using it for screenshots in ESO, which is an online game that I can't pause, so being able to take my time and play with shaders and get juuuuust the right look was a real treat!
I use Peacemaker's No Occluder mod to prevent weird shadows from appliances/cabinets.
Credit: Kitchen Clutter | Solid Wood Texture by @myshunosun
Download (Patreon) Always free, no ads.
780 notes
·
View notes
Note
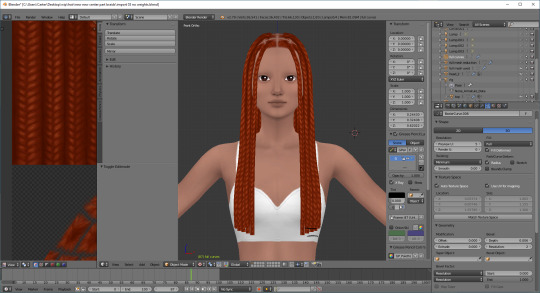
hiii. I love the way you do your cc. could you posibly give me some tips about how you do cc braids ( do you mesh it or start from 0 ?). Thanks !!!
hi! i have used the same method to mesh all of my braided styles since 2020, starting with my bria braids. i mesh them from scratch using curves!
i'll include some tips and little things that i do along with some blender screenshots below the cut :) ⬇️
most of these tips will make sense if you've used blender before, but feel free to ask me any questions about any of the tips, curves in general or anything like that!
i do all of my meshing in blender 2.79. i always start with my braid base of choice + some references!
this is a current wip as curves ⬇️
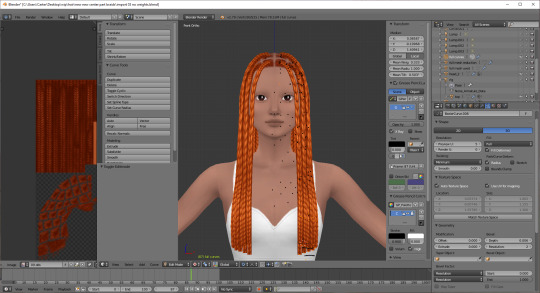
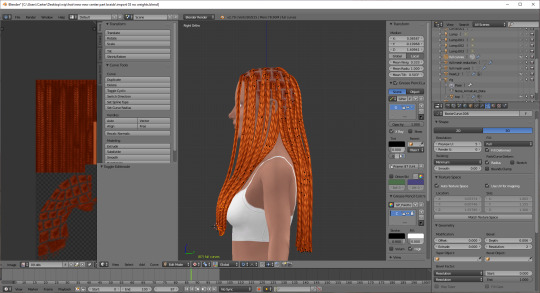
you can see my curve settings on those screenshots as well. i find that using any mesh resolution above 2 is overkill. another tip is to use the "auto texture space" option. if you have a horizontal braid texture, you can have a live texture! you no longer have to look at gray curves and i also find that this helps me identify clipping.
i also set my bezier curve handles to "automatic" initially, and then when I'm satisfied with the overall shape, I change them to "manual" to better fine tune the braids. i achieve the "look" by starting the bezier curves inside of the sim's head so the braids look more like they are attached to the scalp and there's less cleanup work to be done.
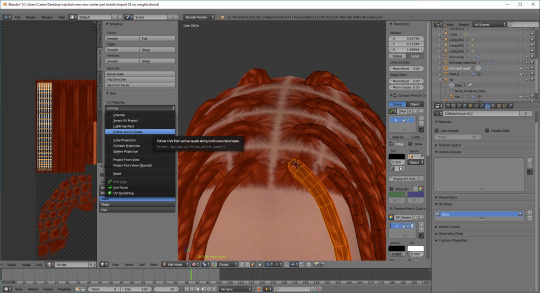
⬆️ using that texture space feature also sets up the uv map but i take it a step further and unwrap the uv map again (using active quads) to get more proportional texturing (notice how on the curves the texture is really tight near the roots?). make sure to mark a seam so the uv mapping actually works.
this is the result ⬇️ notice how the braids are consistent all the way down?

from here i make edits to make the hair more "game ready." this involves moving things around the face, ears, shoulders, etc. to avoid clipping and adjusting anything that looks off. from here there are two specific things that I do:

⬆️ i select the middle vertical edge(?) of each braid and remove it, by dissolving those edge loops. i find that this not only reduces the poly count, but also gives the braids a more realistic, flatter look.
⬆️ to "close" the ends of the braids i select all of the bottom edge loops and simply scale them to zero. this can be easily done with a clean uv map and setting the pivot point to individual origins. i also tend to do this with proportional editing on, so that the braids have a little bit of a taper at the end.

⬆️ here's a before and after of what those edits do to the hair. from here it's weights, morphs, playtesting, hat chops, lods, etc.
#ask#anonymous#i am by no means an expert this is just how i do things!!#please ask me questions so i know this makes sense 🙈#click the images for hq :)
17 notes
·
View notes
Text
Kit's Aquarium-Keeping Tips!
I'm increasingly frustrated with people not taking the best care of their pets so!! I'm making a little guide for my own sanity. Starting with the big one!
MYTH: Fish grow to the size of their aquarium! FACT: Keeping fish in too-small aquariums will stunt their growth and generally be unhealthy for them!
Fish need room in their aquarium to swim around, and having plenty of space means your tank will overall be cleaner!
Want to get into the hobby but don't know where to start? Get a tank anywhere from 5-20 gallons! That's big enough for most small fish to thrive! Fish bowls are not sustainable for most fish without bio-active set ups because they lack one key component: a proper filter for your beneficial bacteria to grow in! It is one of the worst things to enter main-stream media.
Here's the most common things I come across:
BETTA FISH
These guys are typically kept solitary, but can have friends if you have a big enough tank! Just make sure to have the tankmates in prior and a backup tank if your betta decides it likes being alone, since they get territorial (this is why you notoriously cannot keep two males together) and especially so in smaller tanks.
I recommend getting at LEAST a 5 gallon, you'll see a ton of activity from your little guy! They're best in low-flow tanks with plenty of taller decorations/plants to rest on. NOT shrimp-safe (they WILL eat smaller ones).
GOLDFISH
One of the most iconic fish pets, one of the most abused. Lots of people get these as prizes at fairs and don't realize how massive they get! These are usually feeder/comet goldfish that reach 6 inches in length and require much bigger thanks than the standard fish!
Not compatible with sensitive fish due to the amount of ammonia they produce, best in larger tanks (20+ for even the smaller ones). With proper care, these guys will live SEVERAL years, if not dozens.
COMMUNITY FISH
These guys are usually tetras or other small fish! They like being in SCHOOLS or SHOALS. You know what this means? They like COMPANY! Three is the BARE MINIMUM for these guys. You want to see your little guy out and about? Give him some guys to hang out with for a confidence boost! Want to see them swim around in tighter groups? SIX fish or more will get you there!
ALGAE
The bane of hobbyists everywhere. ALL tanks will grow algae, and this will more often than not require manual removal from YOU! Yes, there ARE algae-eating critters, but they will not keep it at bay forever! Reducing algae growth is a few simple steps even!
Manage how much light your aquarium gets every day! It should be getting 8 hours MAXIMUM. That means after 8 hours, the lights are off COMPLETELY. The blue "night mode" still contributes to algae growth, so make sure to turn this off, too!
Don't overfeed! Most fish will only need to be fed once per day at most, and they only need a small amount of food! Their stomachs and eyes are of comparable size, to put it in perspective.
Test your water for nitrates and phosphates! This is basically fertilizer that algae will feed off of and the main reason why you should be doing water changes. If your nitrates are up, do a water change to bring it down. If your phosphates are up, get a phos-pad to remove it! It's just a sponge you can add to your filter!
For pesky free-floating algae (aka algae blooms), you can simply turn the lights completely off for a couple weeks until it clears up! For planted aquariums, you can either encourage the plants to out-compete the algae with CO2 or add a UV light to your aquarium (either a bulb insert for your filter or a filter with a UV light included). Make sure the bare UV light isn't directly in the tank because it is harmful to both your fish and YOU!
KNOW YOUR TANK
I run into a surprising amount of people who can't tell me the size of their aquarium or what kind of fish they're keeping in it. Some people can't even tell me what kind of water they have! (Hint: It's either freshwater, saltwater, or rarely brackish)
Can't remember? Write it down, take pictures, whatever helps! It makes it much easier to research or get advice with when you have the proper names and sizes of everything!
BE RESPONSIBLE!
Want to get your bestie new fish for their tank as a surprise? Ask them about it!! They'll love to talk about it and you can unwittingly weasel all the information you need to know.
Need to move and can't take them with you? Fish grown way too big for you to feasibly take care of it? Something else? Ask your local fish/pet stores or fish & wildlife rescues if they take donations or will otherwise accept them! Ask around community groups! Whatever you do, just don't dump it outside in a pond/river/etc., ESPECIALLY if it's a species that is non-native to your area! Some places like Florida have a HUGE invasive species problem because of irresponsible (if not illegal) pet dumping!
#[fis]#fishkeeping#aquarium#I probably missed a few points here and there but#this is the culmination of trying to work with a LOT of people#this is more venting than anything else TBH#but I'll be happy if this actually helps anyone
4 notes
·
View notes
Text


The Main Character
Maintenance Manual
(Page 1: Be hotter than yesterday. Page 2: Repeat.)
Step aside, peasants, because I’m about to show you how to glow like you own this entire simulation. This isn’t skincare; it’s a full-blown ritual to remind the universe who the real star is.
Spoiler alert: It’s me. And I’m not here to be subtle. Get ready for a face that could break hearts, shatter expectations, and maybe even cause a few meltdowns. ✨
Step 1:
Spray your face with rose water like you’re cleansing the sins of your exes. If it doesn’t feel like a baptism in Chanel, you’re not doing it right.
Step 2:
Slather on serum like it’s holy oil. Manifest flawless skin while whispering ��I’m too pretty for this dimension.”
Step 3:
Gua sha until your cheekbones could cut through generational trauma. Bonus points if you mutter “new face, who dis” mid-stroke.
Step 4:
Eye cream goes on like you’re trying to erase every time you looked at someone who wasn’t worth it.
Step 5:
SPF but make it a love spell. As you apply, chant: “No UV ray formed against me shall prosper.”
Step 6:
Lip balm so glossy it blinds your enemies. They can’t throw shade if they’re too busy squinting.
Step 7:
Stare in the mirror and say: “I am the glow. I am the glitch. I am the mainframe malfunction.”
Mwah,

#skincare#skincare routine#girly aesthetic#just girly thoughts#just girly things#im just a girl#loassumption#loa tumblr#law of assumption#divine feminine#femininity#deluludivadiaries#divinefemininity#digital diary
3 notes
·
View notes
Text
Blender: A Gory Struggle - or - an example how software doesn't think in narrative
I'm working on a project in Blender where I'm trying to transpose an old-timey map, which has been rendered in gores (a series of vesica pisces shapes which, when cut out and carefully glued onto a sphere, would transform a flat map into a globe).
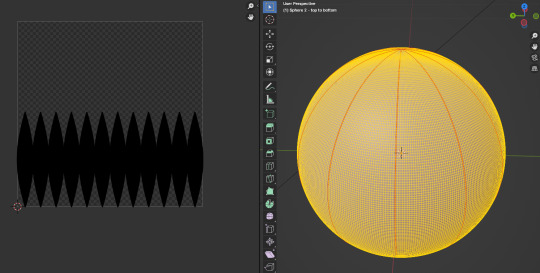
So I've got your standard sphere, and I've marked out the seams for the UV map to make these gores. There are twelve. It looks great, right?
Ha ha! Foolish human!
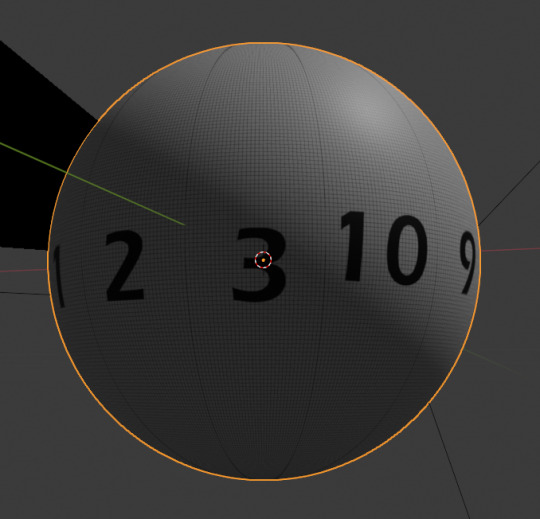
Even though I was careful to mark the seams in series, Blender apparently decided that these islands could be in some apparently random order. If I apply a texture map where the gores are numbered 1 through 12, I get the above. There is no rhyme or reason or identifiable pattern that I can find that would tell me that maybe I could mark the seams differently and get it to do what I want.
Now, I can move these UV islands around; I could in theory move the gores so that they're in numerical order now that I know where Blender decided to place them. But Blender doesn't seem to support precision movement of islands except by super tiny increments, and it won't tell you any informational readout (such as the location, on the x + y axis, of the geometric selection of points you've selected). Maybe it does, but I haven't figured out how to display this yet and I got tired of Googling "how do I (do this thing I want to do) blender" because lately that's all I seem to be doing. So maybe later. But the problem is: if I move them manually and I'm inaccurate (which I will be, because I'm human, which is why I'm using Blender in the first place) then it will mess up my texture map.
Okay, so the other option is to simply separate the gores of my image and move them as needed to assemble the final texture map. If I use the above as a guide, and then move the numbers on the texture map to where their gore-island actually is on the UV map, I can make it work:

This will function, but the problem is, if I wanted then to print out this texture map and hang it on my wall, the gores would not be in order and it would look terrible.
The frustrating thing is that I know, like any reasonable human being, what the gores are, what they're for, and that they should be ordered 1-12 in sequential order around the globe: I am telling a story, which is "How to use an old-fashioned gore-style globe map as a texture map in Blender, and how to possibly export procedurally-generated globe maps into an old-style gore map because this would be cool to print out and hang on my wall." But the software, not being human and having no sense of narrative at all, completely does not understand this. What makes sense to it, in terms of what goes where, is not what makes sense to me.
7 notes
·
View notes
Note
How do you come up with your papercraft models? Specifically, how do you decide what sorts of 3D shapes to use, and then how do you translate those into 2D (the flat/unwrapped model) It seems very difficult, but I'd love to see your process when it comes to conceptualizing/designing this, if that's alright ^^
It’s most alright anon! I knew somebody would eventually ask about this and I have no problem giving a general explanation of the process I use. I won’t go too much in detail since I don’t feel ready to make a proper tutorial, or I simply feel that there would be easier ways to carry this out. Take in mind I am not a professional and this process was self taught :p
The programs I use to make them are nomad sculpt (for the model itself, and imo it is easier to understand than blender) and procreate (for the first step and the addition of pellets for gluing + colored designs).
1st step is to create a blue print. The blue print will be necessary for later when you are modeling and also keeps track of the character’s scale. What I do is to take a frontal image of the character I am creating (in this example, yes man) and then trace the parts I will want it to be divided in. The objective here is to simplify the character as much as possible so that people don’t work with complicated shapes.

2nd step is to use this blueprint on nomad sculpt and set it as a background. With this you can now have a reference of the location and size of each piece. However, it is up to you to decide the width and additional shapes the back of the character may have. In my opinion deciding these for yourself is way easier than having to draw an accurately measured second blueprint of the side view.

Once you have the model ready, for the 3rd step you’ll have to start to trace the polygons of the model in procreate and arrange them properly. I’d say this is the most tedious and complicated step of the process since I literally take PICTURES of each part and I need to ensure their scale matches with the part I begin with. It’s not easy to explain, but just consider it as a method of “manually” creating your own UV unwrap. I am aware it is possible to unwrap it and instantly receive the polygons for me to trace but my method allows me to decide where each polygon will be positioned. This is an example of what I do with the current papercraft I’m working on.

And lastly once you have all of the pieces traced you can go ahead and add the small triangles or trapezoids (I call them pellets) on the sides so the papercraft can be glued together. It is important to consider the place where you draw the pellets because sometimes it can be hard to glue them if they’re positioned in a certain way. As for the colored designs, I just draw them manually like usual and use some personal techniques to ensure they fit altogether.
That’s basically all the process I taught myself explained from the surface, and all of it surged because I didn’t have a windows device where to download Pepakura designer (popular papercraft designing program). Since I will need a device with windows for later on in my career I will hopefully get to download Pepakura and have an easier time with the models, but for now this is what I do and it surprisingly works well enough. If you (or anybody) have any other questions I’ll gladly be up to answer them, and thank you for asking this too :3
16 notes
·
View notes
Note
What’s the process for making an ultrakill model?
pretty similar to a modern asset! i'll try to keep this short(ish): blockout -> high poly -> low poly -> unwrap -> bake -> texture for modeling i use 3ds max (id use blender if i was proficient), with sculpting in zbrush if needed. for uv unwrapping i use max still, packing i use uvpackmaster in blender because its better than a human can do. baking in marmoset toolbag. texturing in substance painter with pixel8r, a retro art plugin i develop
the way it differs from modern assets is all in the texturing. i use the bakes to generate lighting information from some base material layers, then do manual paintover on top of that. i always* paint with pixel8r enabled, which allows me to work pixel perfect. * sometimes ill disable pixel8r to paint faces, and then clean up with pixel8r on i hope to record my process for my next model and upload it after its revealed.
30 notes
·
View notes
Note
Ahhhhh thank you for showing me step by step how you created Jetfire’s wings. You’re so nice :) I saw your completed TC model on mechncheese’s post and it is SOOOOOO lovely! It has a painterly look to it and it’s so pretty to look at. Did you export his model into a digital art software (like Krita, Procreate), paint him, then export him back into blender thru UV unwrapping?
np!! :)
so no actual texturing was done with his model, it's all material nodes!
im unsure if you're referring to how the cloaked tc model (which i sent in before but you could be talking about the non-ask post they made with the model so Hmm) has grime is or just his general cel shading, so ill cover both here :)
(another read more post!! yayyy)
here's his cloaked version's cloak and the nodes for it!! it uses the same shading style as the rest of his normal model so it'll kill two birds with one stone

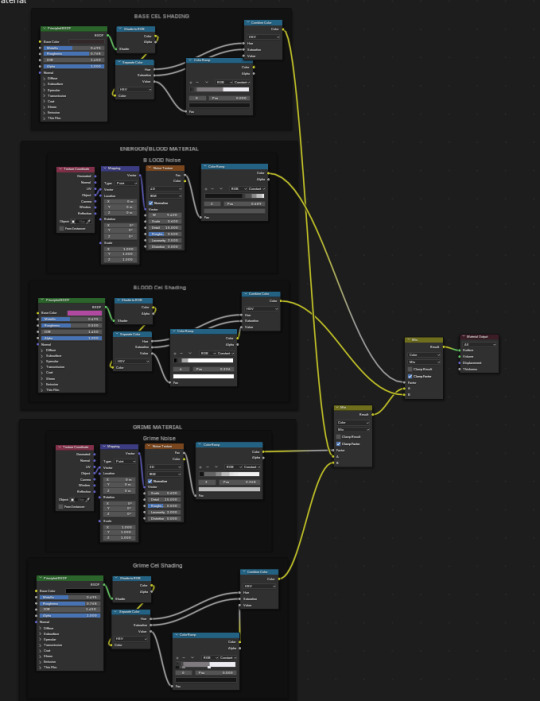
to break it down:
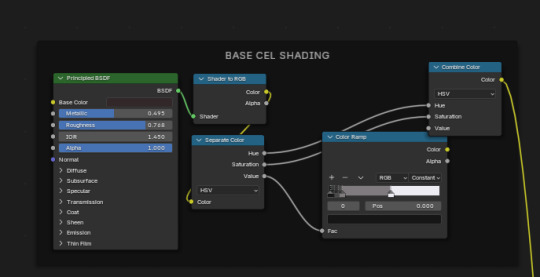
this is the base material! for the basic cel shading effect ive separated the material into HSV and hooked the Value up to a color ramp set to constant so it darkens/lightens in steps rather than gradually :) the hue and saturation are kept the same as the base shader so the material remains affected by the lighting
if you want this alone for the material, you'd just hook the color value from that last Combine Value up to Surface on the material output

next up! the Grime


the grime gets its own material and goes through the same process as the base cel shading does (in the box at the bottom)! on its own it does not layer with the base material, so there's noise set up to help make cutouts of the grime material onto the base material in the following Mix node :) i have the noise stepped like the cel shading as well so it has a sort of layered effect to it
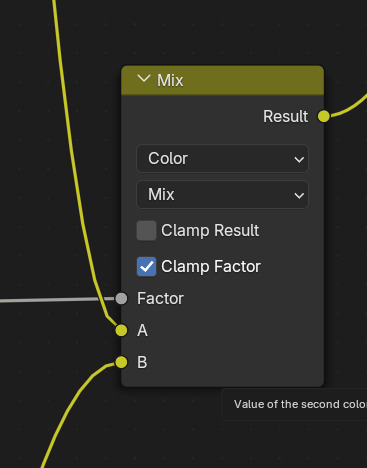
the grime's Noise Color Ramp Color value goes into the Factor, the Grime Cel Shading goes into B, and the Base Material goes into A!! this will be the first layer that goes into the next Mix node later :)

next up are the little energon splatters on his cloak, which is set up similarly to the grime :)
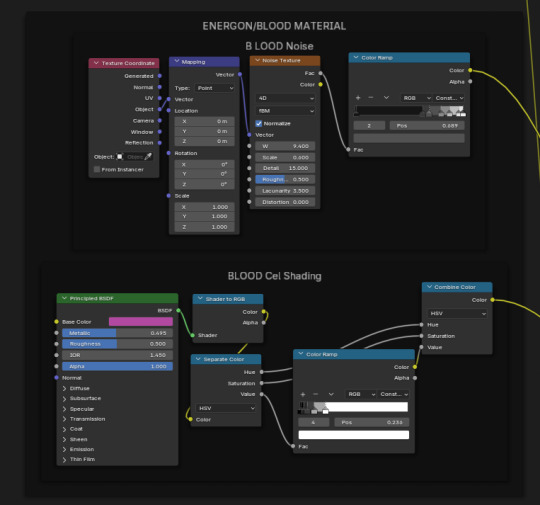
the only difference is that the color ramps are a little different and ive got the noise texture set to 4D LOL

then i make another Mix Node to mix it with the first Mix Node and make the second layer over the other materials
the Result of the Grime+Base Material Mix Node goes into A this time while the Blood Cel Shading goes into B!! with the factor being attached to the Blood Noise :)
then you connect that into the Material Output and bam!!!!!! funky textured cloak (seen at the top of this post)
this may have been more than you asked for but id already written a solid portion of the post before i realized you might really only be asking about the cel shading HAHA sorry if that's the case
OH fun fact when i started messing with the materials i wanted to make something that looked sort of like Risk of Rain 2's shading style because i really like how that game looks visually :)
starting to ramble a bit but there actually is a plugin that allows you to hook up krita directly to blender (im pretty sure) so you can edit textures live!! so if you want to manually texture a model yourself that's probably super convenient to have, i recommend looking into it if that's something that interests you
2 notes
·
View notes
Note
hi!! i wanted to ask how do you get your blockbench textures to look so nice and even? it's very good, i love it!
whenever i use the program it gets all messy - i guess uv mapping just confuses me its wacky in blockbench and i'm after all a beginner. i really like the stuff you do so i wanted to ask!
keep up the good work you're cool :)
Thanks for reaching out! Blockbench's pre-generated UVs pretty much always come out organized and angled in odd ways, and while it's really good for representing exactly how big an angled polygon actually is, it almost never aligns cleanly, and I'm really particular about getting pixel-perfect UVs where possible!
I don't think my method is the best (though I've not seen many others'), but I manually adjust every UV face, moving things and reshaping them until they're clean and as pixel perfect as possible. With more complex and organic shapes I'll try to focus them down in sections, so for example the front, sides, back etc, and set their UVs up to align fitting a view directly facing those cardinal directions. Here's an example in my model of Mirage Ultrakill:
This comes with at the very least a bit of distortion, up to a lot, but to me it's worth it so that things slot together. Here's part of her texture/UV setup as well if it helps!
While setting UVs I'll also use a checkerboard texture to maintain continuity, you can see some of that distortion in the face at this angle, but when using the final texture it's not nearly as evident.


I hope this helps, even if just a bit! Feel free to reach out for input or advice anytime :-)
18 notes
·
View notes
Text
i know im the one constantly complaining about people who say sv is the superior software & every vocal should have an sv bank but im a voca scene defender first & foremost & if u start trying to exclude it and other "ai" programs just because u let the internet train u into recoiling from any mention of ai then maybe u shouldnt be starting events u claim are centered around the community as a whole. its ai in the sense of an algorithm so the default tuning isnt quite as "robotic" it's still ur same ethically sampled voice it still requires quite a bit of user effort. it is so fucking far from one click and done auto generation. if ur saying this i know uve never worked with or seen anyone actually working with them because damn the "ai" is so off and so bad sometimes looking at default pitch lines is one of my favorite pastimes because of it. perhaps its making the process just a bit easier but its still so immensely different from going to an ai generation site to make say squidward sing a britney spears song. even tools like voice to midi or vocalochanger arent really touching that. its not the same thing. if u really know what ur doing u can do everything those 2 tools do only manually its really just helping streamline the process. its not even mandatory u can forego them entirely. are you really going to sit there and say songs with hours of effort put into the vocal synth, to get the notes in, tune everything, keep it timed, edit the phonemes so it sounds more like the intended words, all of that means nothing because it has a few tools with a name you dont like. im not sitting here and arguing for ai learning like chatgpt or whatever. there is in fact a difference from mass sourcing information or art from nonconsenting and often completely unaware people and taking a few more hours of samples from a paid consenting voice provider to make an instrument sound a little more like them with a little less user effort. these are still SYNTHS these are INSTRUMENTS just because one guitar plugin sounds more like a real guitar than a different one doesnt mean u need to boycott the more realistic one. also, hell, for a lot of if not all of (i havent kept up with all of them) v6 voicebanks there are, in terms of use, things that they tell you not to have them sing about. very specifically saying thats what they do and do not consent to having their voices used for. and it Does vary per synth its not a cover all. some of u need to learn to stop jumping at buzz words and actually learn what it is ur dealing with.
#im normal about vocal synths#if this incites violence in my inbox may i remind u im an adult with a job & we both have better things to be doing#if ur a classic voca fan then have the nerve to say that instead of wording things for the general community#only to later retract it and say u only think certain synths count
10 notes
·
View notes
Text
Been having a right time of it with the 3D art.
Looking into exporting work from blender into a game engine. (Looking at godot.)
But my animations use multiple UV maps for texture animation, right? And it's just not showing up in godot. I am using dot glb files as that is what the godot documention recommends.
I spent a few days reading through the godot documentation and fiddling with the import advanced settings before I finally plugged my glbs into a generic 3D object program and realised that it's not that godot isn't importing my UVs, it's that blender isn't exporting them in the first place.
So now I'm reading through the blender manual and combing through all of the blender gltf export settings. And it looks like there isn't actually a way to do this? It might just not be possible at all?
The blender manual recommends using one UV map and using a UV offset to move that map around a single texture image containing everything you want to have in your animation.
I try looking up online forum posts where people had the same problem or video tutorials or anything like that, and again I see people recommending using UV offset and not UV maps.
The thing is, UV offset and UV maps are two different tools for texture animation. They each have different trade offs.
UV offset allows you to use only one UV map, but you have to have a larger texture image. Multiple UV maps allows you to make a smaller texture image.
Like texture animation of the face of a character. Like you would see in games like Animal Crossing. With the UV offset method, your texture image has to contain every single face you want your character to be able to make, each distinct and separate. The UV offset allows you to move the single UV Map along to each of those faces in the texture image.
But if you're using the UV maps method, then you only need to have each left eye and each right eye and each mouth in your texture image. And then you only move the specific UVs corresponding to those facial features. Depending on the art style, you can get away with only having left eyes and no right eyes, and then simply laying the UVs over that in reverse to have a mirrored left eye (a right eye) on the right side of the face.
My preference is for the UV maps method. For two reasons.
One is that I enjoy the art challenge aspect of low poly art, and I do actually want to try making more articulated detailed characters with fewer tris and smaller texture images.
Second is that the UV maps method simply allows for more control. You can, for example, change how wide or narrow your character's smile is on their face without any change at all in the mesh or texture. Say if you want to animate a character with a big smug grin, you can use the texture of a normal smile but change the UV map so that it stretches across the full face of the mesh.
Technically, you could also achieve the big smug grin look by stretching the mesh. But with a lowpoly character, what happens when the part of the mesh with the smile on is only 2 tris? You want to have 2 piddling little tris stretching around the entire character's head? That's just not going to look right! The UV map method allows for greater control, as the area of the mesh assigned to the face on the texture image could be 2 tris in one UV map and it could be every tri across the face on another UV map.
But all of this is a moot point. The blender manual says that glb exports can only store animation data for transform and rotate and scale and bones and shape keys. Every other animated property is simply removed from the export.
And coming back to godot again, apparently mesh materials only have a maximum of 2 UV maps in godot? At least that's what it shows in the mesh instance node. UV map animation might just be dead in the water.
I'm going to experiment around with exporting different file types before I commit to rethinking how I animate characters. lol
Either way, I don't see this as time wasted. I have gained familiarity and experience with how these softwares work and why they behave the ways that they do.
8 notes
·
View notes
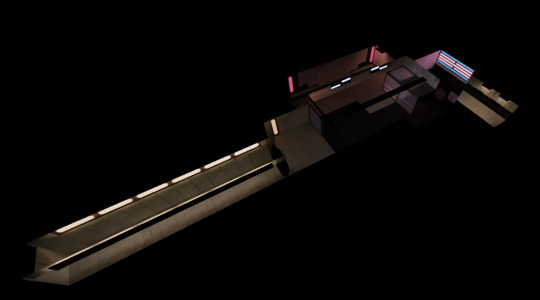
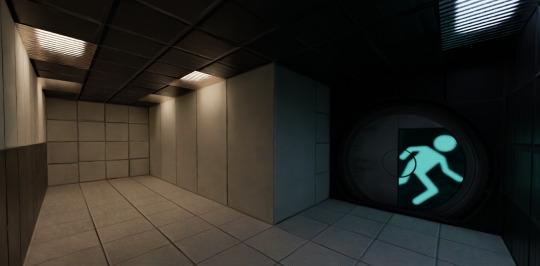
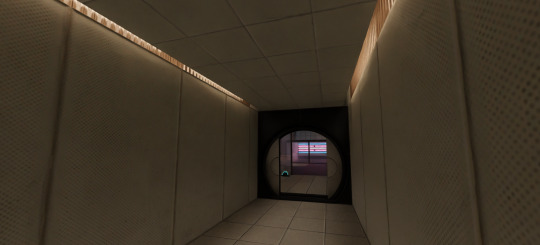
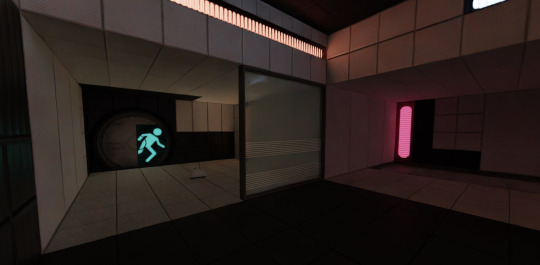
Text
too lazy to explain what the project was/is about by this point

Basically the whole point of this all was to have
Most of Portal 2's materials compatible with Blender
Have said materials to be 'tiled' under some sort of generated coordinates via mapping vector shader nodes, as well as a "switch" variable driven by geometry attributes to switch, between the generated coordinates for a face/s of a mesh, to have them to instead use an UV map and arrange the textures' position * manually * when needed
kind of working glass light panels and a variety of types (as well as allow for custom coloring via geometry nodes' instancing and yet more geometry attributes)
some sort of instancer for props or idk
And lastly indicator lights that are technically tiled in that way, without having to manually arrange the textures for it via uvs (which would take a while)
*(Also just a sample video for the last thing)
the stuff to explain could get much longer but ngl im kinda burnt out anyway, although at least most of this works anyway
other previous screenshots also

7 notes
·
View notes
Text
How To Clean Water Tank
Introduction:
Clean water tanks is important yet we should often keep on maintaining the water and we should ensure the quality of water is suitable for drinking water and daily purposes . In this comprehensive guide let us discuss about What is water tank cleaning , its essential and its importance.
What Is Water Tank Cleaning service?
It refers of hiring the professionals who cleans water tanks bythe process of removing mud, dirt, sediments, algae, bacteria everything from water storage tanks. These tanks can be found in residential buildings, commercial buildings, factories, So it is essential to ensure the water they store which remains pure and safe for consumption.
Why Is Water Tank Cleaning Important?
1 Water Quality:-
Over the period of time without cleaning the tanks , the water stored in it will be getting contaminated with mud, dirt, bacteria, etc. Which in return makes the water quality poor and makes the drinking water foul taste
2. Health Concerns:-
Waterborne diseases like cholera and typhoid can be caused by consuming contaminated water which has algae , bacteria etc. Well, Regular cleaning helps to prevent these health risks.
3. Efficient Water Flow:=-
Clean tanks ensure efficient water flow and adequate pressure in pipelines, preventing plumbing issues and water wastage.
4. Tank Longevity:-
Regular maintenance, including cleaning, can extend the lifespan of water tanks, saving you money on repairs and replacements.
What is Water Tank Cleaning Process:
The process of cleaning a water tank involves the following steps:
1. Draining: The tank is emptied of all water to start access the cleaning process
2. Scrubbing: The side walls of the tank are scrubbed to remove dirt. This can be done manually or with the help of scrubber.
3. Disinfection: After cleaning, the net step is to disinfectant the tank to kill the remaining bacteria or algae. This is usually done using correct chlorine levels or other chemical disinfections.
4. Rinsing: The tank is thoroughly rinsed to remove any traces of cleaning agents or disinfectants.
5. Refilling: Finally, the tank is refilled with clean water.
What is Water Tank Cleaning machine:
The machines used in cleaning water are
Submersible Pump
Pressure Washer
Scrubber
Vacuum Cleaner
UV light
Frequency of Water Tank Cleaning:
The frequency of cleaning your water tank depends on several factors like the capacity of the tank, the quality of the water source,. In general, residential tanks should be cleaned at least once a year, while commercial and industrial tanks may require more often cleaning.
How to clean water tank at home easily:
Empty the water tank
hard brush the side walls of the tank
take out all the dirt from the tank with vacuum cleaner
wash the tank with the clean water
leave it to dry
How to clean water tank without removing water:
Add vinegar to the water which helps to remove the algae and bacteria.
Professional vs. DIY Cleaning:
While some homeowners attempt to clean their water tanks themselves, Which is quiet risky ,it's often safer and more effective to hire professionals. Professional cleaning services have the expertise, equipment, and materials necessary to ensure a safely dispose of liquid waste and unclean water by giving proper water treatment
Conclusion:
In summary, cleaning of water tank is an essential process that ensures the quality, safety, and efficiency of your water tank. Regular cleaning helps maintain clean and healthy water, prevents waterborne diseases, and to increase the lifespan of your water storage tank. Whether you have a small residential tank or a large industrial one, prioritizing cleaning of water tank is a responsible choice that benefits both your health and the environment.
For professional cleaning services in Bengaluru, you can get a free Quote on B Tank Cleaning Services. We offer modern solutions to keep your water tanks clean and your water supply safe. Don't hesitate to contact us for expert assistance in maintaining a healthy water supply for your home or business.
2 notes
·
View notes
Text
Carport Canopies
Carports are a great way to protect your car from the elements. They are easy to install, economical, and can be matched to your house to add a custom look to your property.
The frame of a canopy can be cleaned with a simple soapy water solution, but you should reserve more abrasive cleaning for stubborn stains and mold.
Easy to Assemble
All of ALEKO’s carport canopy packages come with a user manual and all the necessary hardware needed for an easy assembly process. Even the largest model can be assembled by two people in about 6 to 8 hours.
Using galvanized steel and powder-coated pipes, the temporary garage shelter is highly durable and rust resistant. This makes it a great option for outdoor equipment storage, bulk storage, and off-season gear. The carport also features a high-quality PE fabric that protects cars, trucks and equipment from sun exposure and rain.
To assemble the portable metal carport, you simply connect the pipes using T-connectors and angled connectors. You can then add the tarp and use the anchors to secure it to the ground. For best results, ALEKO recommends that you install the anchors in groups of three for added stability. The anchors can be used for either dirt, gravel or asphalt applications. In addition, the portable carports can be placed on concrete bases for additional security.
Affordability
Carport canopies are a great way to keep your vehicle under cover without breaking the bank. They are also very easy to assemble, allowing you to protect your vehicle in no time at all.
When shopping for a new canopy it is important to consider the material used and if the frame has been powder coated. This will help to prevent corrosion and rust on the steel, which will in turn lengthen the lifespan of the structure.
A good option is a portable model that uses galvanized steel and has polycarbonate roofs, which are both very strong and durable. These models will typically have a slightly higher price tag than permanent ones, which can be made from a variety of materials but tend to be sturdier as they do not focus on portability or ease of set up. This is because they are designed to be permanently fixed in position and will often have a higher build quality with thicker materials.
Versatility
A carport can be a very versatile addition to your home. It can protect your vehicles and other belongings from different weather elements, as well as provide a shelter for outdoor activities such as parties and BBQs. It also adds value to your property and can increase its curb appeal.
Carports come in a variety of styles, from those that resemble fully structured shelters to canopy models that look more like large tents. Your specific needs and budget will determine which one is right for you.
The VEVOR carport is a high-quality model that offers a lot of value for the price. Its durable fabric is water- and UV-resistant, making it a great choice for year-round use. Its frame uses patented ShelterLock stabilizers for increased stability, and its Ratchet-Tite cover tensioning system helps to ensure a tight cover and door panel connection. It weighs 134.6 pounds and comes with a one-year limited warranty on the cover fabric and end panels.
Environmentally Friendly
Carport canopies are an environmentally friendly solar energy solution that provides shade and renewable power. They provide a way for businesses and communities to meet their environmental and energy needs while using existing land. The optimum tilt and orientation of the canopy maximizes energy generation, allowing the building to receive payments from the feed-in tariff while saving money on electricity bills.
They also help to reduce greenhouse gas emissions and increase the resilience of the community. The canopy’s photovoltaic cells convert sunlight into electricity and can be used to power buildings, equipment, and lighting. It’s also a great way to demonstrate your commitment to green energy and inspire others to follow suit.
Pyramid Aluminum is an experienced team that can help you select the best canopy for your space. We’ll discuss your vision, take accurate measurements, and engineer your new structure. We will then manufacture and install your new canopy. It will look good, save you money, and be easy to maintain.
youtube
source https://carportscanberra.wordpress.com/2023/07/29/carport-canopies/
3 notes
·
View notes
Note
i have quite a lot of hair breakage from going to bed with wet hair which i am trying to stop doing (i don’t use heat), do you have any (preferably affordable) product recommendations that could help with this in the time being?
Yup! So with hair breakage, the big goals are to have a gentle wash routine and to deep condition the hair. In general, you want to avoid shampoos that contain sulfates and opt for products that are designed for damaged hair instead. You also want to make sure that you're shampooing just the scalp, not the mids and ends of the hair. Introducing a deep conditioning treatment and a leave-in conditioner into your routine will also help to deal with the breakage.
The best products for damaged hair tend to be from the Olaplex line, but those can get pricey. So instead, I would try the Monday Haircare Moisture Shampoo or Tresemme Keratin Repair Shampoo, Dove Hair Therapy Conditioner for Damaged Hair Breakage Remedy, Pantene Hair Mask Miracle Rescue Shots, or the tgin Miracle RepaiRx Anti-Breakage Serum, and the Sun Bum Revitalizing 3 In 1 Leave In Treatment.
Other things you might want to consider are:
Getting regular trims: trims can help get rid of split ends, preventing them from traveling up the hair shaft and causing more breakage.
Avoiding tight hairstyles: Styles like tight ponytails, braids, and buns can cause stress on the hair and lead to breakage. Go for looser hairstyles instead.
Being gentler while brushing: Use a wide-toothed comb or a brush with flexible bristles to avoid unnecessary tension on the hair. Start from the tips and work your way up to the roots. If you can, wait until your hair is dry to brush it.
Protecting your hair from the sun: UV rays can damage the hair cuticles, leading to breakage. Wear a hat or use hair products with UV protection (like the Sun Bum 3 in 1 treatment) when spending time in the sun.
Using a silk or satin pillowcase, or putting your hair up in a silk wrap before going to sleep: friction is one of the main reasons for manual damage that leads to split ends and breakage, and a silk or satin pillowcase can help to reduce that friction. This one is $10 on Amazon and has good reviews.
Finally, breakage can be a symptom of a larger problem, such as nutritional deficiencies or an underlying medical condition. If you're working to repair your hair but still noticing a lot of breakage, you may need to supplement biotin, vitamin D, or omega-3 fatty acids or speak with your doctor, especially if you're noticing other symptoms.
4 notes
·
View notes
Text
Why Are Money Counting Machines Becoming Essential for Businesses in Bangladesh?

In today’s fast-paced business environment, time and accuracy matter more than ever. Handling large volumes of cash manually is not only time-consuming but also prone to human error. This is where a Money Counting Machine proves to be a game-changer. Whether you're managing a retail store, a corporate office, a bank, or a service center in Bangladesh, this tool can significantly improve your daily workflow. If you're considering investing in one and want to understand more, you can visit Money Counting Machine price in Bangladesh for helpful insights and current product options.
Across Bangladesh, the demand for these machines is steadily rising. People are realizing that efficiency and security are key when dealing with cash. Curious about the Money Counting Machine price in Bangladesh? Before we get into that, let’s explore why so many business owners and general users are now turning to this technology.
What Is a Money Counting Machine?
A Money Counting Machine, often called a Money Counter Machine or Currency Counting Machine, is a device designed to accurately and quickly count paper currency. Advanced models can do much more than just count notes—they can detect fake notes, sort denominations, and even scan for damaged currency. These machines are especially helpful in settings where large volumes of cash are handled daily.
Where Are These Machines Used in Bangladesh?
In Bangladesh, these machines are commonly used in:
Banks and financial institutions
Retail stores and shopping malls
Supermarkets and wholesale shops
Government offices
NGOs and private offices
Mobile banking agents and cooperative societies
In any business where cash handling is frequent, a Currency Counting Machine helps reduce risk and maintain accuracy.
How Do Money Counting Machines Work?
These machines are engineered to count stacks of money quickly using mechanical sensors and rollers. Once the notes are inserted, they are pulled into the machine and counted automatically. Some models come equipped with fake note detector features, using UV (ultraviolet), MG (magnetic), and IR (infrared) sensors to identify counterfeit currency while counting.
Some machines even allow you to pre-set batches—say 20, 50, or 100 notes—so the machine stops automatically at that number. This is especially useful for preparing daily deposits or customer change bundles.
Why Is a Fake Note Detector Important in Bangladesh?
The circulation of counterfeit money has become a concern for many businesses in Bangladesh. A money counting machine with fake note detector can scan and identify notes that are not genuine, helping you avoid potential financial loss. This feature is especially beneficial for high-traffic businesses such as retail stores, pharmacies, and restaurants, where it's easy to miss a fake note during busy hours.
The fake note detector technology not only ensures the money you're accepting is real but also boosts trust among customers and clients. It creates a more professional, secure environment in your business.
Real-Life Use Case: How a Local Retailer Benefited
Take the example of a shop owner in Khulna who deals with thousands of taka in daily sales. Before getting a Money Counter Machine, they would spend almost an hour every day counting cash and often made minor mistakes that impacted the day’s accounting. After purchasing a reliable Money Counting Machine with a fake note detector, the time spent counting was reduced to minutes, and errors were virtually eliminated. Additionally, the machine identified a few counterfeit notes that would have otherwise gone unnoticed.
Benefits of Using a Money Counting Machine
Here are some clear advantages of using this machine:
Time-Saving: Count thousands of notes within minutes.
Accuracy: Virtually no counting mistakes.
Security: Detect counterfeit or damaged notes instantly.
Ease of Use: Most machines require no training—just plug and play.
Batch Counting: Set custom bundles (20, 50, 100, etc.).
Portability: Many models are compact and easy to carry.
Clean Operation: Comes with dust covers and cleaning tools to keep the machine in good shape.
Easy Maintenance and Long-Term Use
One reason why many prefer modern Money Counting Machines is that they are built for long-term use. Most models come with accessories like a dust cover, user manual, cleaning brush, and an external display. Some suppliers in Bangladesh also offer a 2-year replacement warranty, giving peace of mind to buyers.
Cleaning is simple, and the machines don’t require much maintenance. Just ensure the sensors stay clean, and the internal rollers are free of dust, and you're good to go.
What About the Price? When Should You Consider Buying?
Now, let’s talk about the Money Counting Machine price in Bangladesh. For those concerned about cost, it’s good to know that you don’t need to break the bank to get one. In most cases, these machines start at around BDT 21,000, depending on features like fake note detection, counting speed, and display options. The price may increase with more advanced features, but the investment is well worth it considering the time, accuracy, and safety it offers.
If you're handling moderate to large amounts of cash every day, it's definitely a wise time to invest. Whether you’re a bank employee, a shop owner in Dhaka, or running a small enterprise in Rajshahi, this tool can simplify your operations dramatically.
Choosing the Right Machine for Your Needs
Here are a few tips for selecting the best Money Counting Machine:
Look for a model with fake note detection features.
Choose a machine that offers external display options for customer transparency.
Make sure the warranty is at least one year, ideally two.
Prefer machines that support batch settings and can handle mixed denominations.
Verify after-sales support and availability of spare parts from the supplier.
You can check out available models and compare specifications directly at Money Counting Machine price in Bangladesh to make an informed decision.
Final Thoughts
In the world of business and finance, managing cash efficiently is no longer a luxury—it’s a necessity. A Money Counting Machine not only saves you time and prevents costly errors but also ensures your money handling practices are secure and professional. With the added benefit of fake note detection, you're protected against counterfeit currency as well.
So, if you’re still counting money by hand, it might be the right time to upgrade. This simple tool could save you hours every month and add more accuracy to your business. Explore the options, compare features, and choose the best fit for your needs. And remember, a smart investment today can lead to smoother operations tomorrow.
1 note
·
View note